- Joined
- 11/22/24
- Messages
- 12
- Points
- 153
I was an Economics undergraduate, and Windows is not a necessity for me. Before university, I chose a Mac for its portability (and to avoid video game distractions).
When I joined the C++ course, it took me about a week to smoothly run C++ on my Mac without a Windows virtual machine. While Xcode is native to macOS, many - including myself, faced issues opening existing projects. VS Code, with its extensive customization and convenience, became my preferred choice. "To do a good job, one must first sharpen their tools." So, I took the time to configure it properly.
This course has been around for 10 years, and it’s clear that the number of Mac users is growing. Here, I’ll share a step-by-step guide to help Mac users set up VS Code for C++ in just 10 minutes.
Why Can't C++ Files Run Directly in VS Code on Mac?
Unlike languages like Python, C++ is a compiled language, i.e. its source code (.cpp files) must be compiled into an executable before running. VS Code itself is just a text editor and does not have a built-in C++ compiler - you need to install and configure one.
How to Set Up and Run C++ in VS Code on Mac (For single cpp file)?
1. Make sure you have Xcode Command Line Tools installed on your Mac. You can simply run it in your terminal:
This will install: clang++ (a C++ compiler)
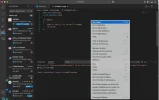
2. Download VS code and open it. We need one extension:

Code Runner compiles and runs in one step using a default compiler, so you don't need to manually type compilation commands like:
g++ my_program.cpp -o my_program
./my_program.
Now you can run your single cpp file directly!

(Don’t forget "command + s" after editing your file)
How to Set Up a Multi-File C++ Project?
This is particularly tricky, but you can just copy my configure files and Makefile to your project if you feel it is too long.
Code Runner can run multi-file projects. But once Boost (Level 8) is involved, it generates hundreds of errors, even you clearly state Boost in your settings. That’s why I directly adjust tasks.json and Makefile instead.
tasks.json is a configuration file in VS Code that automates compiling and running C++ programs. It allows precise control over the build process, ensuring all required files are compiled correctly. However, defining dependencies manually in tasks.json is difficult, especially in a multi-file project, that’s why Makefile is needed.
Makefile tracks dependencies precisely, ensuring only modified files (or those with updated headers) are recompiled, significantly improving build speed. By integrating tasks.json with Makefile, we can achieve both accurate dependency tracking and incremental compilation, making the build process much more efficient.
Here, I will provide a method to run multi-file C++ projects with Boost, though it also works for projects without Boost.
1. you need to add the following line to c_cpp_properties.json in .vscode file:
For Intel CPUs, set “macos-clang-64” instead of “macos-clang-arm64”.

2. Copy my tasks.json
The "Build and Run with Make" task compiles the project and executes the generated binary, with errors and warnings properly displayed in the Problems tab.
The "Clean Build Files" task runs make clean, ensuring a fresh build by removing compiled artifacts like object files and the final executable, preventing issues from outdated dependencies.
3. Set up the Makefile
Right click your project lists area in Vscode and create a new file, rename it as “Makefile”, then copy the settings that I provided.
Basically, it compiles .cpp files into a build directory while automatically tracking dependencies and only recompiling modified files, improving build speed. The run target executes the compiled program.

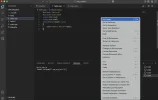
Every time you want to run your multi-file project now, locate the file containing main( ), press Cmd + Shift + B to compile and hence execute, displaying the result.

As you can see, it works the same as manually selecting files for compilation. On the second run, it detected that no files were changed, so it skipped the compilation step and directly built the project. This can save you a lot of time, especially as a beginner when you need to compile and run repeatedly. You don’t have to type the names of 10 files just to compile your project once.
Additionally, all files generated during the compilation and build process can be removed using the make clean command.

I attached my .vscode file, you can change its name as ".vscode" and copy it in your mac’s project’s root directory. But be careful about your CPU (M-series vs. Inte) as well as your Boost directory and version by brew info boost.
This is simply the setup I found most convenient for this C++ course. In the future, you are highly likely to encounter more complex scenarios, such as multi-entry projects or multi-project management. However, I believe that if you understand Makefile, you will always be able to customize solutions that fit your use case. This is also why I insist on using VS Code.
Of course, if you encounter any issues or have a better solution, feel free to leave a comment!
When I joined the C++ course, it took me about a week to smoothly run C++ on my Mac without a Windows virtual machine. While Xcode is native to macOS, many - including myself, faced issues opening existing projects. VS Code, with its extensive customization and convenience, became my preferred choice. "To do a good job, one must first sharpen their tools." So, I took the time to configure it properly.
This course has been around for 10 years, and it’s clear that the number of Mac users is growing. Here, I’ll share a step-by-step guide to help Mac users set up VS Code for C++ in just 10 minutes.
Why Can't C++ Files Run Directly in VS Code on Mac?
Unlike languages like Python, C++ is a compiled language, i.e. its source code (.cpp files) must be compiled into an executable before running. VS Code itself is just a text editor and does not have a built-in C++ compiler - you need to install and configure one.
How to Set Up and Run C++ in VS Code on Mac (For single cpp file)?
1. Make sure you have Xcode Command Line Tools installed on your Mac. You can simply run it in your terminal:
xcode-select –install
This will install: clang++ (a C++ compiler)
2. Download VS code and open it. We need one extension:
Code Runner compiles and runs in one step using a default compiler, so you don't need to manually type compilation commands like:
g++ my_program.cpp -o my_program
./my_program.
Now you can run your single cpp file directly!
(Don’t forget "command + s" after editing your file)
How to Set Up a Multi-File C++ Project?
This is particularly tricky, but you can just copy my configure files and Makefile to your project if you feel it is too long.
Code Runner can run multi-file projects. But once Boost (Level 8) is involved, it generates hundreds of errors, even you clearly state Boost in your settings. That’s why I directly adjust tasks.json and Makefile instead.
tasks.json is a configuration file in VS Code that automates compiling and running C++ programs. It allows precise control over the build process, ensuring all required files are compiled correctly. However, defining dependencies manually in tasks.json is difficult, especially in a multi-file project, that’s why Makefile is needed.
Makefile tracks dependencies precisely, ensuring only modified files (or those with updated headers) are recompiled, significantly improving build speed. By integrating tasks.json with Makefile, we can achieve both accurate dependency tracking and incremental compilation, making the build process much more efficient.
Here, I will provide a method to run multi-file C++ projects with Boost, though it also works for projects without Boost.
1. you need to add the following line to c_cpp_properties.json in .vscode file:
"/opt/homebrew/Cellar/boost/1.87.0/include"
(be careful of your directory and version, you can check this by typing "brew info boost" in your terminal).For Intel CPUs, set “macos-clang-64” instead of “macos-clang-arm64”.
2. Copy my tasks.json
The "Build and Run with Make" task compiles the project and executes the generated binary, with errors and warnings properly displayed in the Problems tab.
The "Clean Build Files" task runs make clean, ensuring a fresh build by removing compiled artifacts like object files and the final executable, preventing issues from outdated dependencies.
3. Set up the Makefile
Right click your project lists area in Vscode and create a new file, rename it as “Makefile”, then copy the settings that I provided.
Basically, it compiles .cpp files into a build directory while automatically tracking dependencies and only recompiling modified files, improving build speed. The run target executes the compiled program.
Every time you want to run your multi-file project now, locate the file containing main( ), press Cmd + Shift + B to compile and hence execute, displaying the result.
As you can see, it works the same as manually selecting files for compilation. On the second run, it detected that no files were changed, so it skipped the compilation step and directly built the project. This can save you a lot of time, especially as a beginner when you need to compile and run repeatedly. You don’t have to type the names of 10 files just to compile your project once.
Additionally, all files generated during the compilation and build process can be removed using the make clean command.
I attached my .vscode file, you can change its name as ".vscode" and copy it in your mac’s project’s root directory. But be careful about your CPU (M-series vs. Inte) as well as your Boost directory and version by brew info boost.
This is simply the setup I found most convenient for this C++ course. In the future, you are highly likely to encounter more complex scenarios, such as multi-entry projects or multi-project management. However, I believe that if you understand Makefile, you will always be able to customize solutions that fit your use case. This is also why I insist on using VS Code.
Of course, if you encounter any issues or have a better solution, feel free to leave a comment!
Attachments

Last edited: